
|
Have a great invention to help with gardening? Are you the self-reliant type that prefers Building It Yourself vs. buying it? Share and discuss your ideas and projects with other members.
|
 |
|
|
Thread Tools | Display Modes |
|
|
|
|
#1 |
|
Tomatovillian™
Join Date: May 2013
Location: MA 6a/b
Posts: 352
|
RGGS - Rain Gutter Grow System - for more information search for Larry Hall on YouTube/facebook
I have multiple SWCs and they have worked very well for me. I also grow in ground and water manually. When I came across RGGS, I like the separation of watering system and growing system. In a usual SWC, both the systems are inseparable and so are less flexible and need more maintenance work. I also felt that separation of these two systems allows me to use less grow media per plant. I looked around and found that we have couple of TVers using RGGS and Luigiwu helped out by providing details of his build and others helped with more ideas. So here is my build. Hopefully it will help someone when they are building their version of RGGS or some other container system. Rain Gutter Watering system materials - 2 - 10' 2x4 PT lumber 1 - 8' 2x4 PT lumber - to make 6-8 7.5" pieces (or use 2x4 pieces lying around in your garage) 1 - 8' 5/4x6 PT decking - again to make 6-8 4.5" pieces 1 - vinyl gutter few 1 1/2" screws to make the seats box of grk 2 1/2" long screws to attach the seats to the lumber 2 - end caps 1 - kerrick float valve pressure reducer, hose to irrigation tubing adapter, irrigation tubing ... I liked Luigiwu's idea of not piercing the gutter, so this system just lets the gutter sit on the wooden structure. This also helps towards my goal of ease of maintenance/repair Actual dimensions of 2x4 are 1.5" x 3.5" Actual dimensions of 5/4x6 decking are 1" x 5.5" The depth of the gutter I bought was 2.5" So gutter depth + decking board is just the right height for a 2x4 sitting on its edge. The gutter is 4.5" wide. So cut 6 pieces 4.5" long from the decking board Cut 6 pieces 7.5" long from the smaller 2x4. Then attach the 4.5" piece right in the middle of the 7.5" piece These 6 pieces (seats) are going to form the base for the watering structure. The 10' 2x4 is going to be attached to the 2x4 part of this piece while the gutter is going to sit on the decking part of this piece. The pictures should make it clearer pieces created and laid out. (I had 8' lumber, so I joined pieces to make 10' to match the gutter)  The gutter is 10' ft long, but the end caps fit outside the gutter, so at the end, the gutter becomes wider than 4.5". So you need to trim the 10' lumber to match the length of the part of the gutter that is 4.5". I had to trim about 2" Now flip them and attach the seats to the 2x4 lumber. Use clamps when driving the screws. Drill pilot holes before driving the screws.  Flip the structure, this is your base for holding the gutter  Attach the end caps and put the gutter in. (photo without end caps, The end caps are a PITA to fit.)  (did not take pictures after I fit the end caps and installed kerrick valve) That is your watering system. Containers coming up in the next post later .. |
|
|

|
|
|
#2 |
|
Tomatovillian™
Join Date: May 2013
Location: MA 6a/b
Posts: 352
|
On top of this channel rest individual containers. To increase the amount of garden space per watering channel, I went with window boxes placed perpendicular to the gutter. Based on my prior SWC experience, I know that a 3 inch net cup will easily keep the whole container watered.
I drilled holes in the bottom of the container to provide air pruning.  weed block went on the bottom of the container. The containers were filled with 3:2:1 mix. All these shallow containers hold between 3-5 gallons of grow media. They are used for chard, kale, lettuce, herbs. I also plan to add a tomato, a pepper and couple of cukes in walmart bags on the gutter. Here is a photo of the RGGS garden. With the plants I have today, the water in the gutter is used up in two days (about 4 gallons of water) 
|
|
|

|
|
|
#3 |
|
Tomatovillian™
Join Date: Jan 2013
Location: Ardmore,Oklahoma
Posts: 172
|
Hello tnkrer,
I think you will love the RGGS. I built 8 of them 3 years ago and absolutely love the ease and productivity of the system. Good luck and happy gardening! Rick |
|
|

|
|
|
#4 |
|
Tomatovillian™
Join Date: Feb 2006
Location: Den of Drunken Fools
Posts: 38,539
|
Looks great I can tell you put a lot of work into it.
 My Swiss chard looks moth eaten.  Worth |
|
|

|
|
|
#5 |
|
Tomatovillian™
Join Date: Nov 2011
Location: Long Island NY
Posts: 1,992
|
Love it! Well done!

|
|
|

|
|
|
#6 |
|
Tomatovillian™
Join Date: May 2013
Location: MA 6a/b
Posts: 352
|
Thanks Rick, Worth, James.
so far liking the RGGS for greens. Other SWCs systems have better in-built supports for bigger plants like tomatoes and peppers. I plan to add another gutter next year. Don't know if I will add more greens or big plants to that one. Don't have a table saw, so cutting those small pieces to size with a circular saw was somewhat slow going. |
|
|

|
|
|
#7 | |
|
Tomatovillian™
Join Date: Jun 2013
Location: ny
Posts: 1,219
|
Quote:
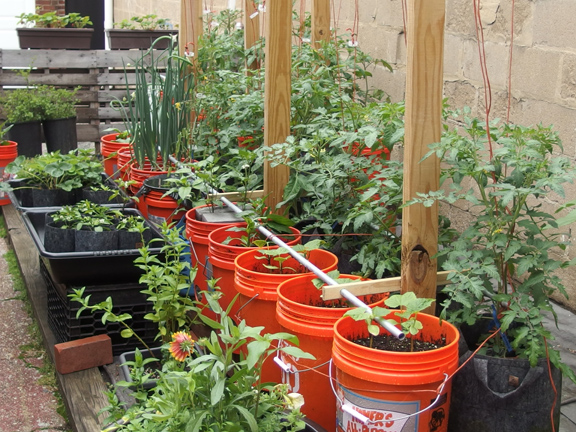
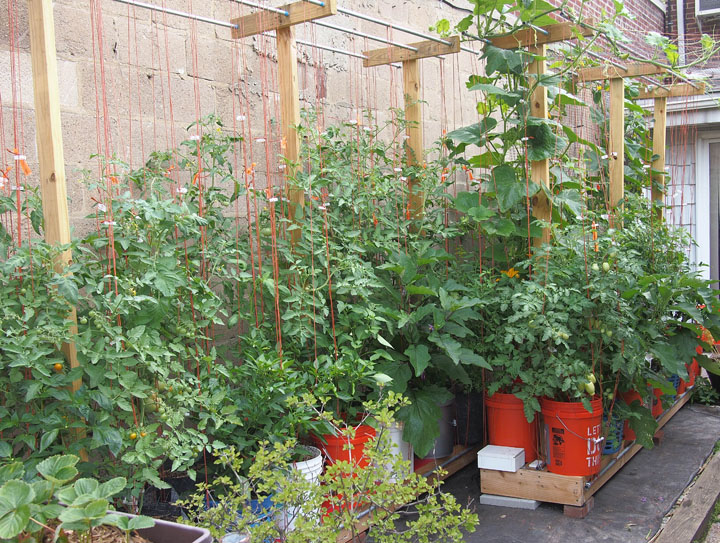
Below: this is 2015  Below: this is 2014 - all support vertically! 
__________________
Subirrigated Container gardening (RGGS) in NY, Zone 7! |
|
|
|

|
|
|
#8 | |
|
Tomatovillian™
Join Date: May 2013
Location: MA 6a/b
Posts: 352
|
Quote:

|
|
|
|

|
|
|
#9 |
|
Tomatovillian™
Join Date: Apr 2010
Location: Metro Detroit, Michigan
Posts: 1,051
|
I think you will really love the system. It has to be the easiest way to garden ever. I leave the roof garden for 2 couple of weeks at a time and it does great. We added another gutter to each of the ones we originally built, thereby doubling our garden this year. I made a straight connection to each of the new gutters from the original ones, so no need for more kerick valves.
Because I used roofing screws to attach the gutters to the 2x4, I only used 3 horizontal 2x4s under each section and they ran to the outsides of the vertical 2x4, bridging the whole framework. They seem very stable, holding 9 5 gallon pails with no difficulty. It sure would save you some cutting. Love the horizontal placement of your window boxes. Gives me some new ideas. |
|
|

|
 |
|
|
