

|
|
#46 |
|
Tomatovillian™
Join Date: Feb 2006
Location: Middle Georgia
Posts: 241
|
Yeah getting the soil wet from the top down when you first set up the box, gets the capillary action going. Sorry I didn't mention it.
__________________
Visit my site: tomatoindex.com a database of over 2700 varieties. Vote for your favorite. |
|
|

|
|
|
#47 |
|
Tomatovillian™
Join Date: Jan 2006
Location: Oz
Posts: 1,241
|
Thats Ok Tim. I should have realised that it needed to be moist to start with. Was just a brain dead moment on my part.
 Trouble with these moments is that they can last for a day or more lately Trouble with these moments is that they can last for a day or more lately 
|
|
|

|
|
|
#48 |
|
Tomatovillian™
Join Date: Jan 2006
Location: Oz
Posts: 1,241
|
Oh yeah, I forgot to say that the resevoir holds 30 litres which is about 6.5 gal. Made two more of them last weekend. Cant wait to try them with the tomatoes.

|
|
|

|
|
|
#49 |
|
Tomatovillian™
Join Date: May 2006
Location: Hudson, NH.
Posts: 4
|
Cool..a DIY thread. Here's a pic (taken yesterday) of my tomatoes in their DIY boxes. My first year trying them and so far so good. I'm using them in the greenhouse and starting some outside this week. I also did a little how to for friends of mine that wanted to make some. Same basic idea that has been floating around the web. My variation was with the screen, I got tired of drilling out the covers so used plastic eggcrate for the inside screen. Here is a link to how I made mine, with more photos of them in action
 . .Dave http://www.myhudsonplace.com/diyearthboxes.html  
|
|
|

|
|
|
#50 |
|
Tomatovillian™
Join Date: Feb 2006
Location: Middle Georgia
Posts: 241
|
Wow! Your plants look amazing! Hope you are pleased with the DIY Earthboxes, I love mine.
__________________
Visit my site: tomatoindex.com a database of over 2700 varieties. Vote for your favorite. |
|
|

|
|
|
#51 |
|
Tomatovillian™
Join Date: Jan 2006
Location: Chatsworth,Calif.
Posts: 117
|
Hi All,
I'm sold on my DIY Earthbox. I plan on making at least a couple dozen more for next year ...Thanks Tim & All !!! [img]  [img]  [/img]  Rob |
|
|

|
|
|
#52 |
|
Tomatovillian™
Join Date: Jan 2006
Location: Oz
Posts: 1,241
|
Those plants looking amazing. Are you guys putting two plants per box or just one??
I really hope mine look that good come spring. Mantis PS Thats a great looking greenhouse Dave. 
|
|
|

|
|
|
#53 |
|
Tomatovillian™
Join Date: Feb 2006
Location: Middle Georgia
Posts: 241
|
Rob,
That casters and cage system is really cool, can I get some detail on that?
__________________
Visit my site: tomatoindex.com a database of over 2700 varieties. Vote for your favorite. |
|
|

|
|
|
#54 |
|
Tomatovillian™
Join Date: May 2006
Location: Hudson, NH.
Posts: 4
|
Tim..thanks! I'm surprised by the growth of the plants in the boxes. At first I was worried there was too much fertilizer, but they have been setting fruit and lots of flowers. The plants are very thick and bushy. I want to see just how much growth the boxes can support so I'm not pruning at all. I'm starting another 15 boxes outside this week along with my usual in ground garden. 4 of the boxes are original EB's someone had given me, so I'll have some good comparisons.
Mantis...I'm putting two plants in each box, so far they are supporting the growth. Thanks for the GH compliment! I built it over the winter so I'd have it for spring. No plans for winter growing, I'm using it for season extension. I'd like to start in mid March and go through November with only water barrels for supplemental heat. Our regular season is June to early October. I put the tomatoes in there on 4/7. Here's a link to more GH pics if your interested  . . Greenhouse Dave |
|
|

|
|
|
#55 |
|
Tomatovillian™
Join Date: Jan 2006
Location: Oz
Posts: 1,241
|
Dave - I use mine for season extension as well and it is great. I have soil in one half and grow the maters in bottomless pots on it. Have done this for years with fantastic results. I have a thread in the Growing under glass forum with some pics.
Built 4 of the homemade boxes as you can see in my posts above this one. Great to know you have two plants in each as I was hoping they would handle that. |
|
|

|
|
|
#56 |
|
Tomatovillian™
Join Date: Jan 2006
Location: S. FLorida / Zone 10
Posts: 369
|
DaveNH- Echoing tim's wow--amazing plants. Earthboxes sure are great as are the knockoff storage box ones. You said you followied EB directions-did you just use a 6-6-6 or 10-10-10 or ?
Love your page too. I like your plastic egg crate sheet idea alot. Instead of tying on pipes though I find it easier to just cut the soil wicking piece of drainage pipe a little taller so that it sticks out above the shelf and then once again support underneath with slightly shorter pieces of drainage pipes. Nowadays I am using net pots (found in hydroponic gardening) for the wicking piece and eliminate all the tying with those too. You simply cut the opening a little smaller so that the rim rests on top of the shelf. It looks very neat and tidy. Then you just use 2 pieces of drainage pipes underneath to support but no need to tie on. At the end of the season roots are easily cleaned off and I soak the pieces in a bit of beach water but it isnt one big unit. Tylenol, nice plant coming along. Looks like you will get lots of tomatoes. _________________
__________________
"When we kill off the natural enemies of a pest we inherit their work." Carl Huffaker |
|
|

|
|
|
#57 |
|
Tomatovillian™
Join Date: Jan 2006
Location: Chatsworth,Calif.
Posts: 117
|
Hi All.
Tim, The "dolly" is just an old piece of 1/2" plywood and cheap plasics casters leftover from a Ikea file cabinet. They had a 1/2" post on them, so I just drilled a slightly smaller hole in the ply and tapped them in. The cage was easy and took about 30 minutes to do. 3-ten foot sticks of 1/2" pvc, 4- 1/2" elbows, and 8- 1/2" tee's. I used 2" x 4" x 4 foot wide wire cuz I had it lying around. I will be cutting the holes larger as the plant grows. The first 4 tees are used for a cross member on the sides of the container, just under the lip. The other 4 tees are about a foot up and turned outward, to help support the wire and leave a gap to access the fill tube. I wrapped a piece of duct tape at the bottom to help during assembly also. Four, 4 foot pieces of pvc, complete the "frame". Plastic ties were used to attach the wire. I did screw the bottom of the frame into the dolly but did not glue any of the pvc together. Finished. the cage sits 5 feet above the container and is 28 inches in diamter. Additional wire and pvc can be added if needed. NOW....when the plant reaches about 4 feet tall....I'm gonna tie a rope around it , put on some inline skates......and go windsurfing up and down the street !! Mantis, Only one plant here and it's "Doc" of the Dwarf Project being co-ordinated by Craig and Patrina. This setup has helped isolate the plant to insure no crossing and I do have 8 fruits set at this time. Dave, Awesome greenhouse and plants NICE !!!!! MsC, Thanks and Happy Growing to you and all! Rob in Calif. http://[img]http://i50.photobucket.c...<br /> <br /> |
|
|

|
|
|
#58 |
|
Tomatovillian™
Join Date: Jan 2006
Location: S. FLorida / Zone 10
Posts: 369
|
Rob, your support cage is great. Very inspirational--will try to do something similar.
This method of the 'guts' of a homemade earthbox eliminates tying with electrial ties. Got the idea from Dreamster who posted it several years ago. Just cut two of the drainage pipe wicking pieces a little longer--they stick up above the shelf slightly- set the others wherever you want the self supported -you need 3 support ones. Very easy to clean and take apart at the end of the season. (the white material on it is a nylon white stocking to make sure the soil stays put but even that is probably not necessary) 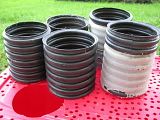 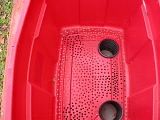 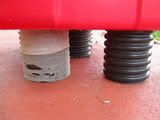  Here it is in action: 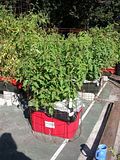
__________________
"When we kill off the natural enemies of a pest we inherit their work." Carl Huffaker |
|
|

|
|
|
#59 |
|
Tomatovillian™
Join Date: May 2006
Location: Hudson, NH.
Posts: 4
|
Mantis..visited your thread and will post GH comments over there
 , nice setup! , nice setup!Rob..I like the cage system, very creative. I'll be using a post trellis. I'll line up the boxes with a post on each end and loop string around the post and plants. It worked well for the outside in ground garden last year. MsCowpea..You've got me thinking about using the flexible perforated drain pipe. The eggcrate is not all that strong and really needs even support, so a couple ties keep the supports in place when placing everything. On any future ones, I will try a few. I really hated drilling the holes for the screen since I had 25 to make, so the eggcrate made my day. My next project is an auto watering system for 25 boxes. Thinking of using adjustable drip emitters off a 3/4 poly waterline to each box. I found some that will output 13 GPH for $1.70. The trick will be to balance the pressure so each box get a similar amount of water. Maybe 3 branches supplying 8~9 boxes, each branch on a timed water valve. Just drop the emitter in the supply tube and run it for 10 minutes each day (2 gals). I bought an Orbit timer system which works great on our flower beds. It's has battery operated electronic programable controller, can control 4 lines, includes 2 valves and a brass 4 way manifold. Cost $35! Additional valves are $15. What is the water usage for everyones tomato boxes? I'm estimating my big plants are soaking about 1 1/2 to 2 gal a day. Dave |
|
|

|
|
|
#60 |
|
Tomatovillian™
Join Date: Jan 2006
Location: S. FLorida / Zone 10
Posts: 369
|
Dave, The original design may have called for perforated drain pipe-I don't remember. I just used the regular type and drilled a few holes but only in the wicking ones not the support pieces.
Every year I say I am going to do some sort of drip irrigation -as I have about 30 15-gal. containers in addition to the 8 earthboxes. (plus other bigger containers) AND raised beds. Now is the time we should be doing something as we plant in fall but don't have much motivation as once I get done ripping out all of these tomato plants we are sick of gardening for a while. Wishing everyone a bountiful harvest. farkee (MsCowpea)
__________________
"When we kill off the natural enemies of a pest we inherit their work." Carl Huffaker |
|
|

|
 |
|
|
